Page speed isn’t just a technical metric, it directly affects how many visitors stay on your site, how many convert into customers, and how well you rank on Google.
A three-second load time on mobile loses roughly 40% of visitors before they’ve read a single word. And since 2021, Google has used Core Web Vitals (real-world measurements of loading speed, interactivity, and visual stability) as a confirmed ranking factor.
The good news is that most WordPress sites are slow for the same handful of reasons, and most of those reasons are fixable without touching a line of code.

Table of Contents
- 1. Choose the Right Web Hosting for Speed
- 2. Install a Caching Plugin to Boost Page Speed
- 3. Resize and Compress Images Before Uploading
- 4. Limit Unnecessary Content and Media
- 5. Minimize the Number of Plugins
- 6. Defer JavaScript Files to Improve Speed
- 7. Enable Lazy Loading for Images
- 8. Self-Host Google Fonts for Faster Load Times
- 9. Minify CSS and JavaScript Files
- 10. Keep Your PHP Version Up to Date for Better Performance
- Quick Checklist
- Frequently Asked Questions
- Want to improve your site speed even further?
1. Choose the Right Web Hosting for Speed
Your hosting is the foundation everything else sits on. No amount of optimisation will fully compensate for a slow or overcrowded server.
Shared hosting (where your site shares resources with hundreds of others) is fine for very small sites with minimal traffic. But if your site is growing or your Google PageSpeed score is consistently low despite other optimizations, your hosting is likely the bottleneck.
Managed VPS hosting gives your site dedicated resources and significantly faster response times. Cloudways is a popular managed VPS option with plans starting around $14/month, a meaningful upgrade in performance for a modest cost.
Rule of thumb: Check your Time to First Byte (TTFB) using a free tool like WebPageTest. If it’s consistently above 600ms, your hosting is the problem, not your theme or plugins.
2. Install a Caching Plugin to Boost Page Speed
Every time someone visits your WordPress site, the server normally runs PHP scripts, queries the database, builds the page, and sends it to the visitor — from scratch, every time. A caching plugin creates a static version of your pages and serves that instead, which is dramatically faster.
For most WordPress sites, WP Fastest Cache is a reliable free option that handles the essentials well. If you want more advanced features — like automatic cache clearing and better minification — WP Rocket is the premium option most performance-focused developers recommend.
Note: Only activate caching after you’ve finished building your site. Caching static pages while you’re actively making changes can cause you to see outdated versions of your own content.
Our step-by-step guide on how to install and configure WP Fastest Cache walks you through the recommended settings from start to finish.
3. Resize and Compress Images Before Uploading
Uploading large, unoptimized images is a common mistake that can slow down your website. A page with oversized images can become several MBs in size, which is far too large for a fast-loading webpage. Aim to keep your total page size below 1.5MB for optimal performance.
Use image compression tools like TinyJPG or WordPress plugins like Smush to reduce file sizes without sacrificing quality. For best results, resize your images in an image editor like Photoshop before uploading.
For compression, tools like TinyJPG and plugins like ShortPixel or Imagify handle this efficiently. For a complete walkthrough of the best tools and recommended settings, see our guide on how to compress images in WordPress.
Also worth doing: Enable WebP conversion. WebP is a modern image format that produces files 25–35% smaller than JPEG at equivalent quality. All major browsers support it, and both ShortPixel and Imagify convert images to WebP automatically.
4. Limit Unnecessary Content and Media
Every element on a page (images, videos, embedded maps, social media feeds) adds to the total weight the browser has to download. A gallery of 30 images compressed to 150KB each still adds 4.5MB to a single page load. An embedded YouTube video or Google Map loads external scripts that add further delay.
Keep only what genuinely serves the visitor. If you have a gallery, paginate it or load it on a dedicated page rather than dropping 30 images onto your homepage. If you embed a map, consider a static image that links to Google Maps instead of a live embed.
5. Minimize the Number of Plugins
Every active plugin on your WordPress site has the potential to add scripts, stylesheets, and database queries to your page load. Some plugins are lean and well-coded. Others are not.
Go through your installed plugins and deactivate and delete anything you’re not actively using. Even deactivated plugins can sometimes leave traces, so deletion is better than deactivation for anything you no longer need. For the plugins you keep, check whether a lighter alternative exists — some popular plugins are known to be resource-heavy.
A good way to identify problem plugins is to disable them one at a time and retest your PageSpeed score after each. The culprit is usually obvious once you isolate it.
6. Defer JavaScript Files to Improve Speed
If Google PageSpeed Insights flags “eliminate render-blocking resources,” JavaScript files are often the cause. By default, the browser stops loading the page to process JavaScript files as it encounters them. Deferring JavaScript tells the browser to load the page content first and handle the scripts after, which makes the page feel faster to the visitor even if the total load time is similar.
The Autoptimize plugin can help you defer JavaScript files and improve page speed. Just enable the “Defer JavaScript” option in the plugin settings to optimize your site’s load time.
By installing the Autoptimize plugin you can enable the following settings to enable defer parsing JavaScript:
- Optimize JavaScript Code
- Do not aggregate but defer
- Also defer inline JS
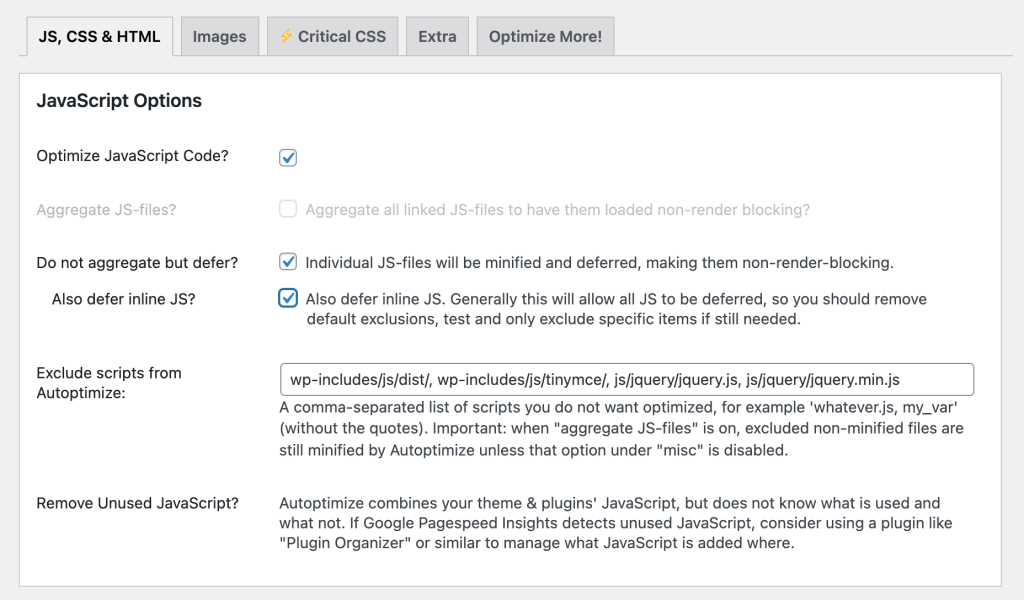
Important: After enabling deferral, test your site carefully. Some plugins and themes rely on JavaScript loading in a specific order, and deferring everything can occasionally break functionality. If something stops working, disable “Also defer inline JS” first, that resolves most conflicts.
7. Enable Lazy Loading for Images
Lazy loading means images below the fold (the part of the page the visitor hasn’t scrolled to yet) aren’t loaded until the visitor actually scrolls down to them. This reduces the amount of data the browser needs to download on initial page load, which directly improves your Largest Contentful Paint (LCP) score, one of Google’s Core Web Vitals metrics.
Lazy loading is enabled by default for images. For most sites, no additional action is needed. If you’re on an older setup or want more control, the a3 Lazy Load plugin extends this to iframes and videos as well.
Don’t forget to optimize your images before uploading them to your website, see 3. Resize and Compress Images Before Uploading before uploading
8. Self-Host Google Fonts for Faster Load Times
If your theme uses Google Fonts, the browser makes an external request to Google’s servers to load them, which adds a small but measurable delay, particularly on the first visit. Self-hosting fonts on your own server eliminates that external request.
The Local Google Fonts plugin handles this automatically. Once installed and activated, visit your homepage so the plugin can detect which fonts are in use. Then go to Settings → Local Google Fonts and click Host Locally.
That’s it, your fonts now load from your own server.
9. Minify CSS and JavaScript Files
Minification removes unnecessary characters from code files (spaces, line breaks, comments) without changing how they function. The result is smaller files that load faster. For most sites, minification alone reduces CSS and JS file sizes by 15–30%.
The Autoptimize plugin handles this cleanly. Go to Settings → Autoptimize and enable:
- Optimize JavaScript Code
- Optimize CSS Code
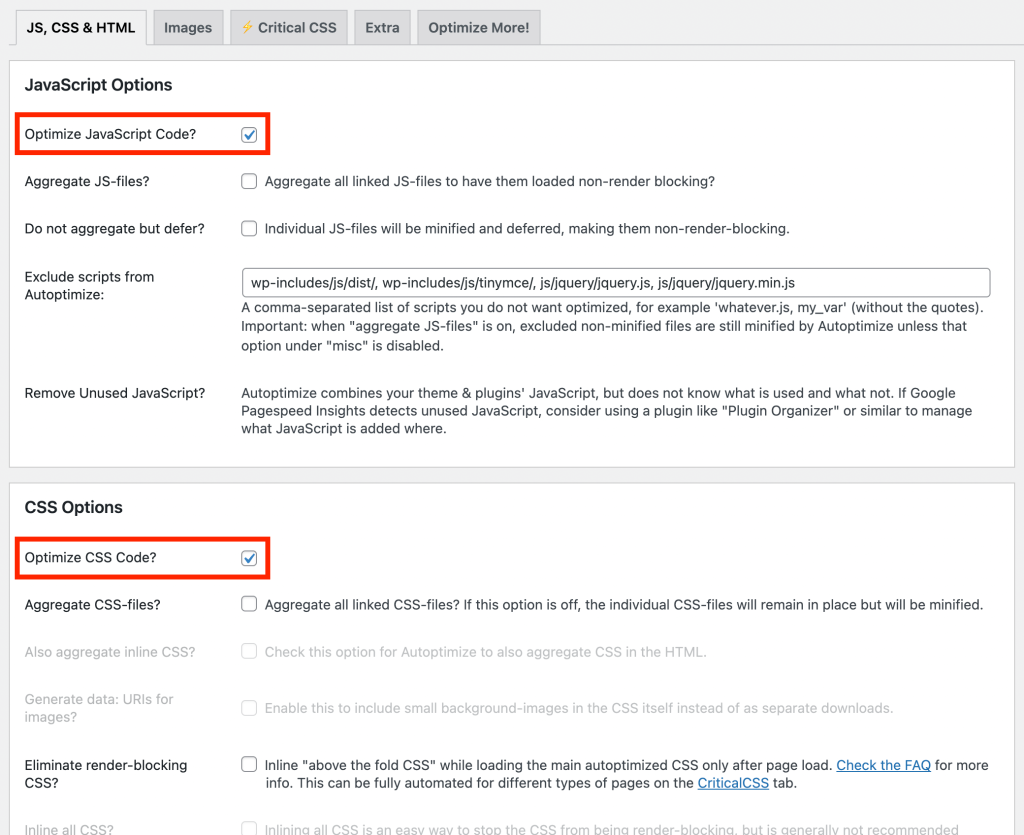
Save the settings at the bottom of the page.
A note on file aggregation: Autoptimize also offers the option to combine multiple CSS or JS files into a single file, which reduces the number of HTTP requests the browser makes. This can help performance, but it can also break your site’s styling or functionality depending on your theme and plugins. The safe recommendation is to leave aggregation off unless you’re comfortable testing thoroughly after enabling it.
10. Keep Your PHP Version Up to Date for Better Performance
PHP is the programming language WordPress runs on, and each new major version brings meaningful performance improvements. Sites running PHP 8.1 or higher consistently outperform those still on PHP 7.x, often loading noticeably faster with no other changes.
Most hosting providers let you switch PHP versions from your control panel. If you can’t find the option, your host’s support team can help. Before switching, make sure your theme and plugins are compatible with the newer version, most reputable ones have been updated for PHP 8.x, but it’s worth checking.
How to check your current PHP version: In your WordPress dashboard, go to Tools → Site Health → Info → Server. Your PHP version is listed there.
Page speed matters most when the rest of your website is working for you too. If you’re a small business owner looking to turn more visitors into customers, see how these performance principles apply in practice across our guides for dental websites, physiotherapy websites, moving company websites, and landscaping websites.
Quick Checklist
Run through this after implementing the tips above:
- Hosting upgraded to managed VPS if PageSpeed scores are consistently low
- Caching plugin installed and configured
- All images resized to correct display dimensions and compressed to under 200KB
- WebP conversion enabled
- Unnecessary plugins deactivated and deleted
- JavaScript deferred
- Lazy loading active for images
- Google Fonts self-hosted
- CSS and JS minified
- PHP version current (8.1 or higher)
Frequently Asked Questions
What is a good PageSpeed score for a WordPress site?
A score of 90 or above on both mobile and desktop is considered good. For most small business websites, hitting 85+ on mobile is a realistic and meaningful target. Scores below 70 on mobile indicate performance issues that are likely costing you visitors and search rankings.
Does page speed affect SEO?
Yes, directly. Page speed is a confirmed Google ranking factor, and Core Web Vitals (Google’s specific measurements of loading performance, interactivity, and visual stability) are used to assess page experience as part of how Google ranks pages. A slow site ranks lower regardless of how good the rest of the content is.
How do I check my WordPress site speed?
The two most useful free tools are Google PageSpeed Insights (pagespeed.web.dev) and WebPageTest (webpagetest.org). PageSpeed Insights gives you a score and specific recommendations. WebPageTest gives you more detailed technical data including Time to First Byte, which helps identify whether your hosting is the bottleneck.
What causes a WordPress site to be slow?
The most common causes, in rough order of frequency, are unoptimised images, slow or overcrowded shared hosting, too many poorly coded plugins, no caching configured, and render-blocking JavaScript. Most slow WordPress sites have at least two or three of these issues simultaneously.
How much does page speed affect conversions?
Significantly. Google’s data shows that as load time increases from one second to five seconds, the probability of a visitor leaving before the page loads increases by 90%. For a local business website receiving several hundred visitors a month, the difference between a two-second and a five-second load time can represent a meaningful number of lost enquiries every month.
Do I need a developer to speed up my WordPress site?
Not for most of the tips in this guide. Installing a caching plugin, compressing images, self-hosting fonts, and minifying CSS and JS are all manageable without technical knowledge. The one area where developer help is sometimes useful is diagnosing plugin conflicts after enabling JavaScript deferral or CSS aggregation, as these occasionally require theme-specific fixes.
Want to improve your site speed even further?
A well-optimized theme plays a big role in performance. If you’re building a small business website, using a lightweight, speed-focused theme can make a noticeable difference.